ເລີ່ມຕົ້ນຢ່າງໄວ
ຍິນດີຕ້ອນຮັບສູ່ເອກະສານ React! ໜ້ານີ້ຈະໃຫ້ຂໍ້ມູນເບື້ອງຕົ້ນກ່ຽວກັບ 80% ຂອງແນວຄິດ React ທີ່ທ່ານຈະນຳໃຊ້ໃນຊີວິດປະຈຳວັນ.
You will learn
- ວິທີສ້າງ ແລະ nest components
- ວິທີເພີ່ມ markup ແລະ styles
- ວິທີສະແດງຂໍ້ມູນ
- ວິທີ render ເງື່ອນໄຂ ແລະ lists
- ວິທີ respond ເປັນ events ແລະ ອັບເດດໜ້າຈໍ
- ວິທີ share ຂໍ້ມູນລະຫວ່າງ components
ວິທີສ້າງ ແລະ nest components
ແອັບ React ສ້າງຂຶ້ນຈາກ components. Component ເປັນຊີ້ນສ່ວນຂອງ UI (user interface) ທີປະກອບມີຕັກກະ ແລະ ຮູບລັກສະນະເປັນຂອງໂຕເອງ. Component ສາມາດເປັນປຸ່ມນ້ອຍໆ ຫຼື ໃຫຍ່ເທົ່າກັບໝົດ page.
React components ແມ່ນ JavaScript functions ທີ່ return markup:
function MyButton() {
  return (
    <button>ຂ້ອຍແມ່ນປຸ່ມກົດ</button>
  );
}
ຕອນນີ້ທ່ານໄດ້ປະກາດ MyButton, ທ່ານສາມາດເອົາມັນໄປຢູ່ໃນ component ອື່ນໄດ້:
export default function MyApp() {
  return (
    <div>
      <h1>ຍິນດີຕ້ອນຮັບສູ່ແອັບຂອງຂ້ອຍ</h1>
      <MyButton />
    </div>
  );
}
ສັງເກດວ່າ <MyButton /> ເລີ່ມຕົ້ນດ້ວຍອັກສອນໂຕໃຫຍ່. ນີ້ເປັນວິທີການທີ່ເຮັດໃຫ້ທ່ານຮູ້ວ່າມັນເປັນ React component. ຊື່ຂອງ React component ຕ້ອງເລີ່ມຕົ້ນດ້ວຍອັກສອນໂຕໃຫຍ່ສະເໝີ, ໃນຂະນະທີ່ HTML tags ຕ້ອງເປັນໂຕອັກສອນນ້ອຍ.
ເບິ່ງຜົນລັບ:
function MyButton() {
  return (
    <button>
      ຂ້ອຍແມ່ນປຸ່ມກົດ
    </button>
  );
}

export default function MyApp() {
  return (
    <div>
      <h1>ຍິນດີຕ້ອນຮັບສູ່ແອັບຂອງຂ້ອຍ</h1>
      <MyButton />
    </div>
  );
}
ຄຳວ່າ export default ແມ່ນລະບຸວ່າເປັນ component ຫຼັກໃນຟາຍ. ຖ້າທ່ານຍັງບໍ່ຄຸ້ນເຄີຍກັບບາງ JavaScript syntax MDN ແລະ javascript.info ມີການອ້າງອີງທີ່ດີຫຼາຍ.
ການຂຽນ markup ດ້ວຍ JSX
Markup syntax ທີ່ທ່ານໄດ້ເຫັນດ້ານເທິງແມ່ນເອີ້ນວ່າ JSX. ມັນເປັນທາງເລືອກ, ແຕ່ project React ສ່ວນຫຼາຍແມ່ນໃຊ້ JSX ເພື່ອຄວາມສະດວກ. ເຄື່ອງມືທີ່ເຮົາແນະນຳສຳລັບ local development ທັງໝົດແມ່ນຮອງຮັບ JSX ທັນທີ.
JSX ເຂັ້ມງວດກວ່າ HTML. ທ່ານຕ້ອງໄດ້ປິດ tag ຄື <br />. Component ຂອງທ່ານບໍ່ສາມາດ return ຫຼາຍ JSX tags ໄດ້. ທ່ານຕ້ອງໄດ້ລວມມັນເຂົ້າໄປໃນ shared parent ຄືກັບ <div>...</div> ຫຼື <>...</> ທີ່ວ່າງເປົ່າ:
function AboutPage() {
  return (
    <>
      <h1>ກ່ຽວກັບ</h1>
      <p>ສະບາຍດີ.<br />ເຈົ້າສະບາຍດີບໍ່?</p>
    </>
  );
}
ຖ້າທ່ານມີຫຼາຍ HTML ທີ່ຈະປ່ຽນເປັນ JSX, ທ່ານສາມາດໃຊ້ online converter.
ການເພີ່ມ styles
ໃນ React, ທ່ານກຳນົດ CSS class ດ້ວຍ className. ມັນເຮັດວຽກແບບດຽວກັບ HTML class attribute:
<img className="avatar" />ຕໍ່ມາທ່ານຂຽນ CSS rule ໃຫ້ມັນໃນຟາຍ CSS ແຍກຕ່າງຫາກ:
/* ໃນ CSS ຂອງທ່ານ */
.avatar {
  border-radius: 50%;
}
React ບໍ່ໄດ້ກຳນົດວິທີການເພີ່ມຟາຍ CSS. ໃນກໍລະນີງ່າຍສຸດ, ທ່ານຈະເພີ່ມ <link> tag ໃສ່ HTML ຂອງທ່ານ. ຖ້າທ່ານໃຊ້ build tool ຫຼື framework, ໃຫ້ເບິ່ງເອກະສານຂອງມັນເພື່ອຮຽນຮູ້ວິທີເພີ່ມຟາຍ CSS ໃສ່ໃນ project ຂອງທ່ານ.
ການສະແດງຂໍ້ມູນ
JSX ໃຫ້ທ່ານໃສ່ markup ລົງໃນ JavaScript. ວົງປີກກາໃຫ້ທ່ານ “escape back” ໃສ່ໃນ JavaScript ເພື່ອໃຫ້ທ່ານສາມາດ embed ຕົວແປບາງອັນຈາກ code ຂອງທ່ານ ແລະ ສະແດງມັນໃຫ້ຜູ້ໃຊ້. ຕົວຢ່າງ, ຈະສະແດງuser.name:
return (
  <h1>
    {user.name}
  </h1>
);
ທ່ານຍັງສາມາດ “escape ເຂົ້າໄປໃນ JavaScript” ຈາກ JSX attributes, ແຕ່ທ່ານຕ້ອງໃຊ້ ວົງປີກກາ ແທນ ວົງຢືມ. ຕົວຢ່າງ, className="avata" ສົ່ງຜ່ານ string "avatar" ເປັນ CSS class, ແຕ່ src={user.imageUrl} ອ່ານຄ່າຕົວແປ JavaScript user.imageUrl ແລ້ວສົ່ງຄ່ານັ້ນເປັນ src attribute:
return (
  <img
    className="avatar"
    src={user.imageUrl}
  />
);
ທ່ານສາມາດໃສ່ expressions ທີ່ມີຄວາມຊັບຊ້ອນຫຼາຍເຂົ້າໄປໃນ JSX ວົງປີກກາໄດ້ອີກເຊັ່ນກັນ, ຕົວຢ່າງ, string concatenation:
const user = {
  name: 'Hedy Lamarr',
  imageUrl: 'https://i.imgur.com/yXOvdOSs.jpg',
  imageSize: 90,
};

export default function Profile() {
  return (
    <>
      <h1>{user.name}</h1>
      <img
        className="avatar"
        src={user.imageUrl}
        alt={'Photo of ' + user.name}
        style={{
          width: user.imageSize,
          height: user.imageSize
        }}
      />
    </>
  );
}
ໃນຕົວຢ່າງຂ້າງເທິງ, style={{}} ບໍ່ແມ່ນ special syntax, ແຕ່ເປັນ {} object ທຳມະດາ ທີ່ຢູ່ຂ້າງໃນ style={ } JSX ວົງປີກກາ. ທ່ານສາມາດໃຊ້ style attribute ເມື່ອ styles ຂອງທ່ານຂຶ້ນກັບຕົວແປ JavaScript.
ການສະແດງຜົນຢ່າງມີເງື່ອນໄຂ
ໃນ React, ມັນບໍ່ມີ special syntax ສຳລັບການຂຽນເງື່ອນໄຂ. ທ່ານຈະໃຊ້ເຕັກນິກດຽວກັບທີ່ທ່ານໃຊ້ຂຽນ code JavaScript ປົກະຕິແທນ. ຕົວຢ່າງ, ທ່ານສາມາດໃຊ້ if statement ເພື່ອລວມ JSX ຢ່າງມີເງື່ອນໄຂ:
let content;
if (isLoggedIn) {
  content = <AdminPanel />;
} else {
  content = <LoginForm />;
}
return (
  <div>
    {content}
  </div>
);
ຫາກທ່ານຕ້ອງການ code ທີ່ສັ້ນກວ່ານີ້, ທ່ານສາມາດໃຊ້ conditional ? operator. ບໍ່ຄື if, ມັນເຮັດວຽກໄດ້ໃນ JSX:
<div>
  {isLoggedIn ? (
    <AdminPanel />
  ) : (
    <LoginForm />
  )}
</div>
ເມື່ອທ່ານບໍ່ຕ້ອງການເງື່ອນໄຂ else, ທ່ານສາມາດໃຊ້ logical && syntax:
<div>
  {isLoggedIn && <AdminPanel />}
</div>
ວິທີການທັງໝົດເຫຼົ່ານີ້ຍັງໃຊ້ໄດ້ກັບການລະບຸ attributes ແບບມີເງື່ອນໄຂ. ຖ້າທ່ານຍັງບໍ່ຄຸ້ນເຄີຍກັບ JavaScript syntax ເຫຼົ່ານີ້, ທ່ານສາມາດເລີ່ມໄດ້ຈາກການໃຊ້ if...else ຢູ່ເລື້ອຍໆ.
ການສະແດງ lists
ທ່ານສາມາດໃຊ້ຄຸນສົມບັດຂອງ JavaScript ຢ່າງ for loop ແລະ array map() function ເພື່ອສະແດງ lists ຂອງ components.
ຕົວຢ່າງ, ສົມມຸດທ່ານມີ array ຂອງ products:
const products = [
  { title: 'Cabbage', id: 1 },
  { title: 'Garlic', id: 2 },
  { title: 'Apple', id: 3 },
];
ທາງໃນ component ຂອງທ່ານ, ໃຊ້ map() function ເພື່ອປ່ຽນ array ຂອງ products ໄປເປັນ array ຂອງລາຍການ <li>:
const listItems = products.map(product =>
  <li key={product.id}>
    {product.title}
  </li>
);

return (
  <ul>{listItems}</ul>
);
ສັງເກດວ່າ <li> ມີ key attribute. ສຳລັບແຕ່ລະລາຍການໃນ list, ທ່ານຄວນສົ່ງ string ຫຼື number ທີ່ບໍ່ຊໍ້າກັນ. ໂດຍປົກະຕິ, key ຄວນມາຈາກຂໍ້ມູນຂອງທ່ານ, ເຊັ່ນ: database ID. React ໃຊ້ key ຂອງທ່ານເພື່ອໃຫ້ຮູ້ວ່າມີຫຍັງເກີດຂຶ້ນຫຼັງຈາກ insert, delete ຫຼື reorder ລາຍການ.
const products = [
  { title: 'ກະຫລໍາ', isFruit: false, id: 1 },
  { title: 'ກະທຽມ', isFruit: false, id: 2 },
  { title: 'ໝາກມ່ວງ', isFruit: true, id: 3 },
];

export default function ShoppingList() {
  const listItems = products.map(product =>
    <li
      key={product.id}
      style={{
        color: product.isFruit ? 'magenta' : 'darkgreen'
      }}
    >
      {product.title}
    </li>
  );

  return (
    <ul>{listItems}</ul>
  );
}
ການຕອບສະໜອງຕໍ່ events
ທ່ານສະມາດຕອບສະໜອງກັບ events ໂດຍການປະກາດ event handler functions ພາຍໃນ components ຂອງທ່ານ:
function MyButton() {
  function handleClick() {
    alert('ເຈົ້າຄິກຂ້ອຍ!');
  }

  return (
    <button onClick={handleClick}>
      ຄິກຂ້ອຍ
    </button>
  );
}
ສັງເກດວິທີ onclick={handleclick} ບໍ່ມີວົງເລັບໃນທາງທ້າຍ! ບໍ່ຕ້ອງ call event handler function: ທ່ານຕ້ອງ ສົ່ງຕໍ່ ເທົ່ານັ້ນ. React ຈະ call event handler ຂອງທ່ານເມື່ອຜູ້ໃຊ້ກົດປຸ່ມ.
ການອັບເດດໜ້າຈໍ
ສ່ວນຫຼາຍ, ທ່ານຕ້ອງການໃຫ້ component ຂອງທ່ານ “ຈື່” ຂໍ້ມູນບາງຢ່າງ ແລະ ສະແດງຂໍ້ມູນນັ້ນ. ຕົວຢ່າງ, ບາງທີທ່ານຕ້ອງການນັບຈຳນວນການກົດເວລາປຸ່ມຖືກກົດ. ເພື່ອເຮັດສິ່ງນີ້, ເພີ່ມ state ໃສ່ໃນ component ຂອງທ່ານ.
ທຳອິດ, import useState ຈາກ React:
import { useState } from 'react';ຕອນນີ້ທ່ານສາມາດປະກາດ ຕົວແປ state ພາຍໃນ component ຂອງທ່ານ:
function MyButton() {
  const [count, setCount] = useState(0);
  // ...
ທ່ານຈະໄດ້ຮັບສອງສິ່ງຈາກ useState: state ປັດຈຸບັນ (count), ແລະ function ທີ່ໃຫ້ທ່ານອັບເດດມັນ (setCount). ທ່ານສາມາດຕັ້ງຊື່ແນວໃດກໍໄດ້, ແຕ່ຫຼັກການແມ່ນໃຫ້ຂຽນວ່າ [something, setSomething].
ເທື່ອທຳອິດທີ່ປຸ່ມກົດສະແດງ, count ຈະເປັນ 0 ເພາະວ່າທ່ານໄດ້ສົ່ງ 0 ໄປທີ່ useState(). ເມື່ອທ່ານຕ້ອງການປ່ຽນ state, call setCount() ແລະ ສົ່ງຄ່າໃໝ່ໄປໃຫ້ມັນ. ຄິກປຸ່ມກົດຈະເພີ່ມຕົວນັບ:
function MyButton() {
  const [count, setCount] = useState(0);

  function handleClick() {
    setCount(count + 1);
  }

  return (
    <button onClick={handleClick}>
      ຄິກ {count} ເທື່ອ
    </button>
  );
}
React ຈະ call component function ຂອງທ່ານອີກເທື່ອໜຶ່ງ. ເທື່ອນີ້, count ຈະມີຄ່າເປັນ 1. ແລະ ຈະມີຄ່າເປັນ 2. ແລະ ອື່ນໆ.
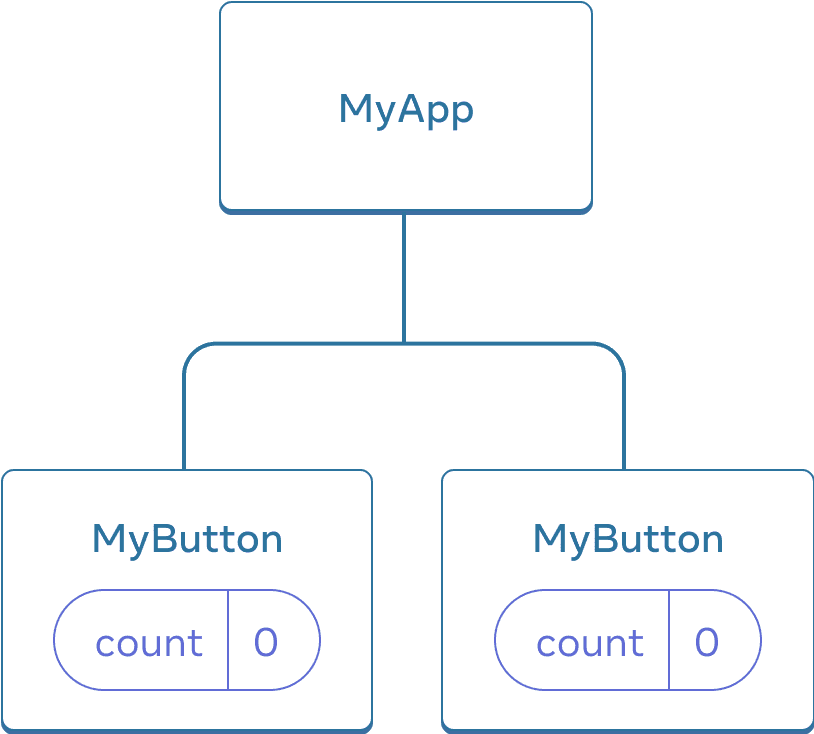
ຖ້າທ່ານ render component ດຽວກັນຫຼາຍໆເທື່ອ, ແຕ່ລະອັນກໍຈະມີ state ຂອງໃຜລາວ. ຄິກແຕ່ລະປຸ່ມແຍກກັນ:
import { useState } from 'react';

export default function MyApp() {
  return (
    <div>
      <h1>Counters ທີ່ອັບເດດໃຜລາວ</h1>
      <MyButton />
      <MyButton />
    </div>
  );
}

function MyButton() {
  const [count, setCount] = useState(0);

  function handleClick() {
    setCount(count + 1);
  }

  return (
    <button onClick={handleClick}>
      ກົດ {count} ເທື່ອ
    </button>
  );
}
ສັງເກດວິທີທີ່ແຕ່ລະປຸ່ມ “ຈື່” state count ຂອງຕົວເອງແນວໃດ ແລະ ບໍ່ສົ່ງຜົນກະທົບຕໍ່ປຸ່ມອື່ນ.
ການນຳໃຊ້ Hooks
Functions ທີ່ເລີ່ມຕົ້ນດ້ວຍ use ແມ່ນເອີ້ນວ່າ Hooks. useState ເປັນ Hook ໃນໂຕທີເຮັດໂດຍ React. ທ່ານສາມາດຄົ້ນຫາ Hook ໂຕອື່ນໆໄດ້ໃນ ອ້າງອີງ API. ທ່ານສາມາດຂຽນ Hook ຂອງທ່ານເອງໂດຍການລວມເອົາສິ່ງທີ່ມີຢູ່ແລ້ວ.
Hooks ມີຂໍ້ຈຳກັດຫຼາຍກວ່າ functions ອື່ນ. ທ່ານສາມາດເອີ້ນ Hooks ຢູ່ດ້ານເທິງ component ຂອງທ່ານ (ຫຼື Hooks ອື່ນ). ຖ້າທ່ານຕ້ອງການໃຊ້ useState ໃນເງື່ອນໄຂ ຫຼື ໃນ loop, ແຕກມັນເປັນ component ໃໝ່ ແລະ ເອົາມັນໃສ່ນັ້ນ.
ການ share ຂໍ້ມູນລະຫວ່າງ components
ໃນຕົວຢ່າງກ່ອນໜ້ານີ້, ແຕ່ລະ MyButton ມີ count ທີ່ແຍກຈາກກັນ, ແລະ ເມື່ອແຕ່ລະອັນຖືກຄິກ, ສະເພາະ count ຂອງປຸ່ມທີ່ຄິກເທົ່ານັ້ນທີ່ປ່ຽນ:

ເລີ່ມຕົ້ນ, state count ຂອງ MyButton ແຕ່ລະອັນແມ່ນ 0
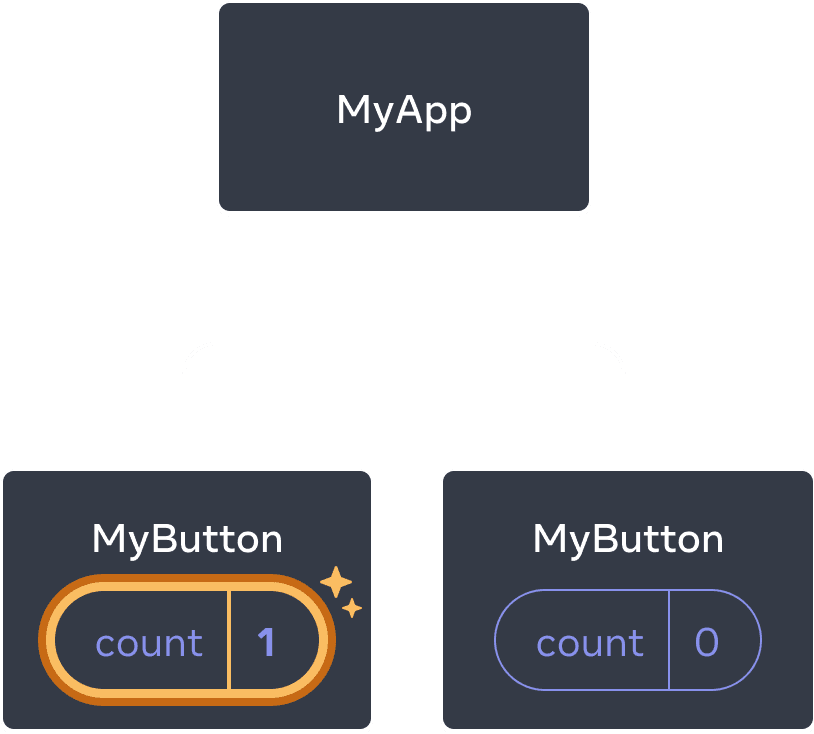

MyButton ໂຕທຳອິດອັບເດດ count ເປັນ 1
ເຖິງຢ່າງໃດກໍ່ຕາມ, ຫຼາຍຄັ້ງທ່ານຕ້ອງມີຫຼາຍ components ເພື່ອ share ຂໍ້ມູນ ແລະ ອັບເດດພ້ອມກັນຢູ່ຕະຫຼອດ
ໃນການເຮັດໃຫ້ MyButton components ທັງສອງສະແດງ count ດຽວກັນ ແລະ ອັບເດດພ້ອມກັນ, ທ່ານຕ້ອງໄດ້ຍ້າຍ state ຈາກຂອງແຕ່ລະອັນ “ຂຶ້ນ” ໄປຍັງ component ທີ່ປະກອບມີພວກມັນທັງໝົດ.
ຕົວຢ່າງນີ້, ແມ່ນ MyApp:
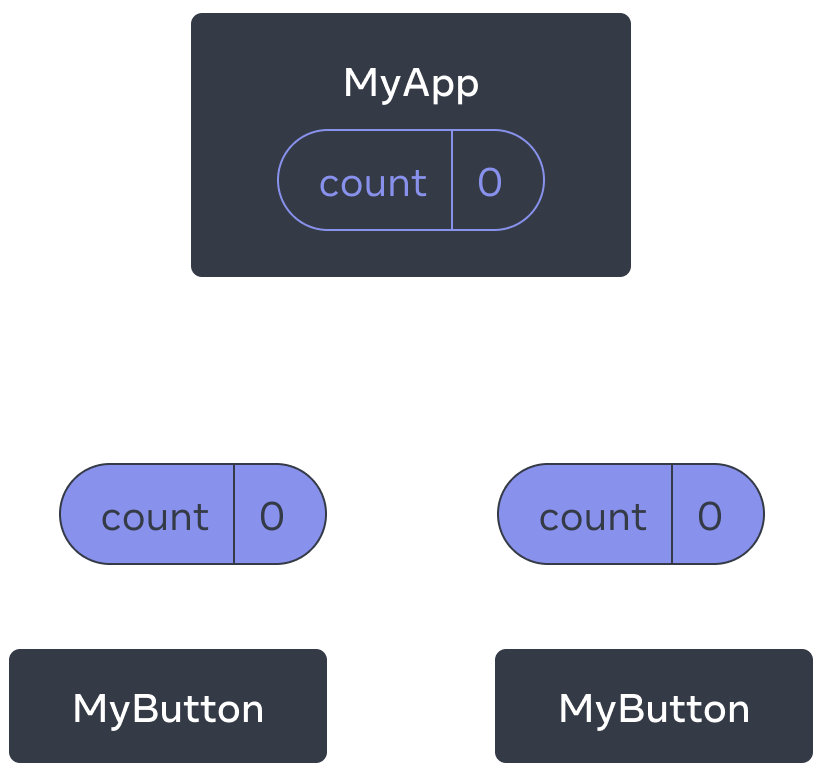
ເລີ່ມຕົ້ນ, state count ຂອງ MyApp ແມ່ນ 0 ແລະ ສົ່ງຕໍ່ໄປຫາລູກທັງສອງ
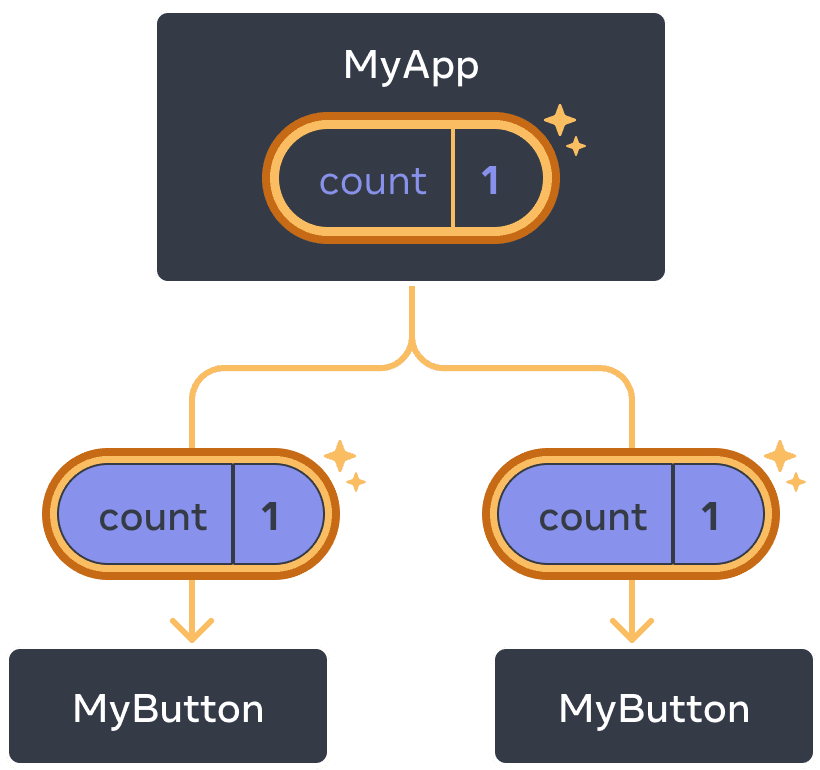
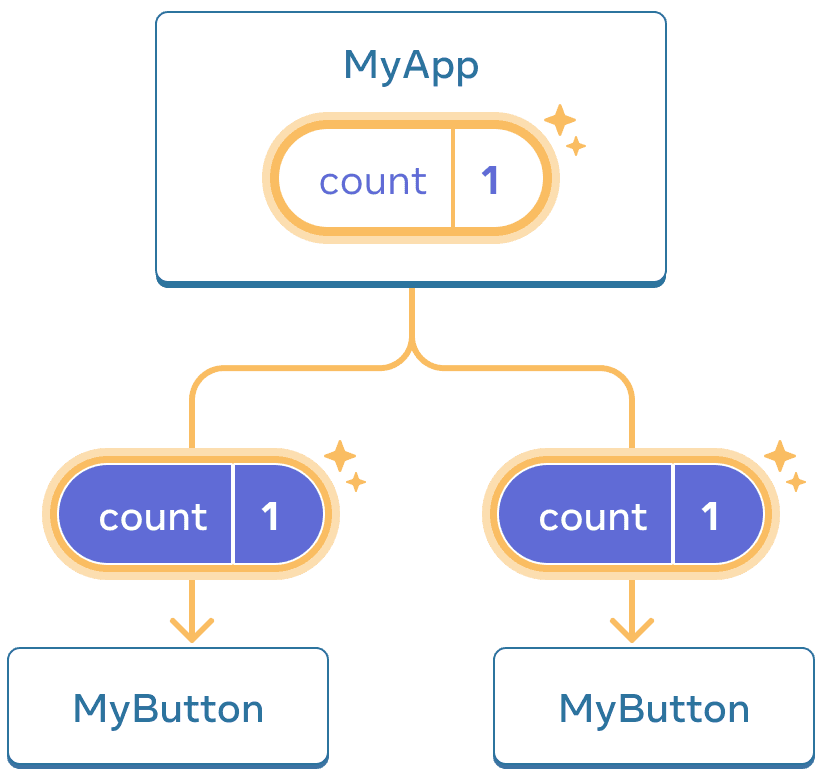
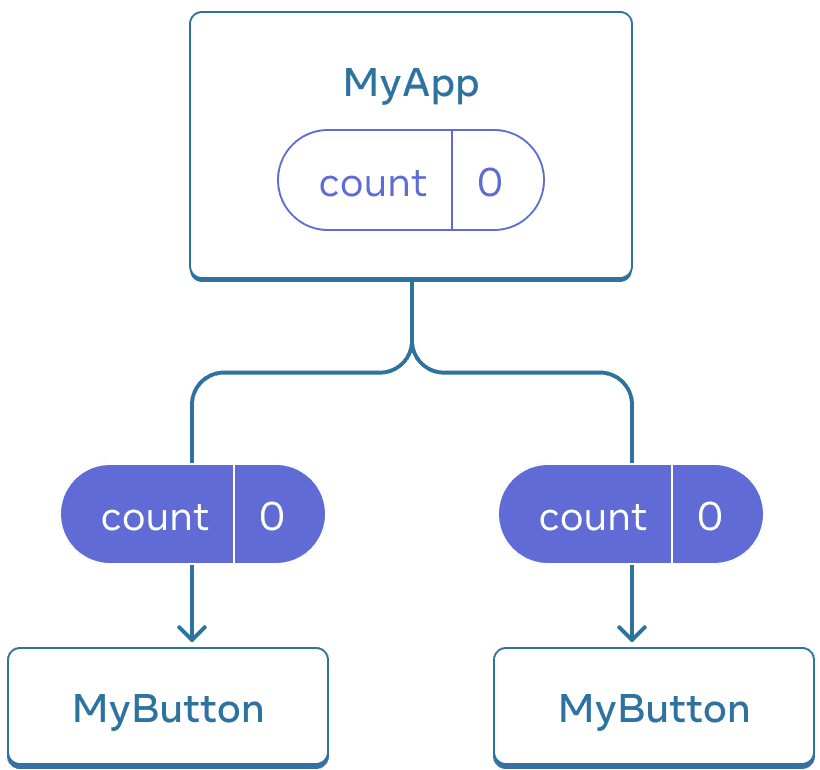
ຕອນກົດ, MyApp ອັບເດດ state count ເປັນ 1 ແລະ ສົ່ງຕໍ່ໄປຫາລູກທັງສອງ
ຕອນນີ້ເມື່ອທ່ານຄິກປຸ່ມໃດໜຶ່ງ, count ໃນ MyApp ຈະປ່ຽນແປງ, ເຊິ່ງຈະປ່ຽນທັງສອງ count ໃນ MyButton. ນີ້ແມ່ນວິທີທີ່ທ່ານສາມາດລອງໃນ code.
ທຳອິດ, ຍ້າຍ state ຂຶ້ນ ຈາກ MyButton ໄປຫາ MyApp:
export default function MyApp() {
  const [count, setCount] = useState(0);

  function handleClick() {
    setCount(count + 1);
  }

  return (
    <div>
      <h1>Counters that update separately</h1>
      <MyButton />
      <MyButton />
    </div>
  );
}

function MyButton() {
  // ... ເຮົາຍ້າຍ code ຈາກບ່ອນນີ້ ...
}
ຈາກນັ້ນ, ສົ່ງ state ຈາກ MyApp ໄປຫາ MyButton, ພ້ອມກັນກັບການ share click handler. ທ່ານສາມາດສົ່ງຂໍ້ມູນຫາ MyButton ໂດຍການໃຊ້ ວົງປີກກາ JSX, ຄືກັນກັບທີ່ທ່ານເຮັດກັບ tag <img>:
export default function MyApp() {
  const [count, setCount] = useState(0);

  function handleClick() {
    setCount(count + 1);
  }

  return (
    <div>
      <h1>Counters ທີ່ອັບເດດພ້ອມກັນ</h1>
      <MyButton count={count} onClick={handleClick} />
      <MyButton count={count} onClick={handleClick} />
    </div>
  );
}
ຂໍ້ມູນທີ່ສົ່ງຜ່ານລັກສະນະນີ້ແມ່ນເອີ້ນວ່າ props. ຕອນນີ້ MyApp component ປະກອບມີ count state ແລະ handleClick event handler, ແລະ ສົ່ງຜ່ານທັງສອງໃນຮູບແບບຂອງ props ໄປຍັງແຕ່ລະປຸ່ມ.
ສຸດທ້າຍ, ປ່ຽນ MyButton ເພື່ອ ອ່ານ props ທີ່ທ່ານໄດ້ສົ່ງຈາກ parent component ຂອງມັນ:
function MyButton({ count, onClick }) {
  return (
    <button onClick={onClick}>
      ຄິກ {count} ເທື່ອ
    </button>
  );
}
ເມື່ອທ່ານກົດປຸ່ມ, onClick handler ຈະເລີ່ມເຮັດວຽກ. propsonClick ຂອງແຕ່ລະປຸ່ມຖືກຕັ້ງຄ່າເປັນ handleClick function ພາຍໃນ MyApp, ສະນັ້ນ code ພາຍໃນຂອງມັນຈຶ່ງເຮັດວຽກ. code ເອີ້ນ setCount(count + 1), ເພີ່ມຕົວແປ state count. ຄ່າ count ໃໝ່ຈະຖືກສົ່ງຜ່ານເປັນ prop ໄປແຕ່ລະປຸ່ມ, ດັ່ງນັ້ນຄ່າທັງໝົດຈື່ງສະແດງຄ່າໃໝ່. ນີ້ເອີ້ນວ່າ “ການຍົກ state ຂຶ້ນ”, ທ່ານໄດ້ share ມັນລະຫວ່າງ components.
import { useState } from 'react';

export default function MyApp() {
  const [count, setCount] = useState(0);

  function handleClick() {
    setCount(count + 1);
  }

  return (
    <div>
      <h1>Counters ທີ່ອັບເດດພ້ອມກັນ</h1>
      <MyButton count={count} onClick={handleClick} />
      <MyButton count={count} onClick={handleClick} />
    </div>
  );
}

function MyButton({ count, onClick }) {
  return (
    <button onClick={onClick}>
      ຄິກ {count} ເທື່ອ
    </button>
  );
}
ຂັ້ນຕອນຕໍ່ໄປ
ຕອນນີ້, ທ່ານໄດ້ຮູ້ກ່ຽວກັບພື້ນຖານຂອງວິທີການຂຽນ code React!
ເບິ່ງ ຄູ່ມື ເພື່ອນຳໄປໃຊ້ແທ້ ແລະ ສ້າງ mini-app ທຳອິດຂອງທ່ານດ້ວຍ React.